Venturing into the realm of at-home lash lifts is a thrilling journey for beauty enthusiasts. It's a meticulous process that, when done correctly, can transform your lashes, giving them that coveted curl and lift without stepping into a salon. However, it's essential to proceed with caution, as the eyes are incredibly delicate. Let's dive into an expanded step-by-step guide, ensuring your lash lift adventure is both successful and safe.
Before You Begin: A Word of Caution
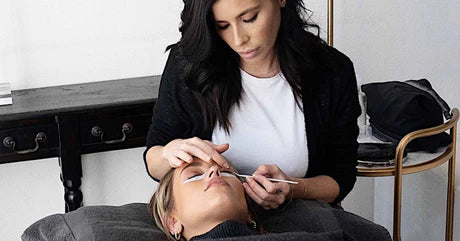
An at-home lash lift requires precision and care, especially when dealing with chemicals near your eyes. It's highly recommended that such treatments be left to professionals. If you decide to proceed, ensure you're not doing it alone. Having someone assist you can provide an extra layer of safety, as self-application with closed eyes increases the risk of mistakes and injuries.
Step 1: Choosing Your Lash Lift Kit
Quality Over Quantity: The market is flooded with lash lift kits, but not all are created equal. Invest in a kit that comes highly recommended by lash professionals, featuring quality ingredients that minimize the risk of irritation. A good kit should include all necessary components, such as the lifting and setting solutions, silicone shields, and a nourishing conditioner, accompanied by clear, detailed instructions.
Step 2: Assessing and Prepping Your Lashes
The Foundation of Success: Begin with a clean slate. Remove all makeup, oil, and residue from your lashes and eyelids, as these can hinder the effectiveness of the lash lift. Assess the natural length and health of your lashes to choose the appropriate silicone shield size, which will influence the curl's final shape and height.
Step 3: Shield Placement
Sculpting Your Curl: Silicone shields are the mold for your lift, dictating the curl's tightness and elevation. Applying these shields requires a steady hand and a bit of strategy. Position them as close to the lash line as possible without causing discomfort, ensuring they adhere smoothly to your eyelid. This step is crucial for achieving an even, natural-looking lift.
Step 4: Applying the Lifting Solution
The Transformation Begins: With precision, apply the lifting solution to the base of your lashes, avoiding the tips to prevent overprocessing. This solution softens the lashes, making them malleable enough to take on the new shape. The application must be even and controlled, as this solution is responsible for the initial phase of reshaping your lashes.
Step 5: Setting the Shape
Locking in Your Look: After the lifting solution has done its work, it's time for the setting solution. This formula hardens the lashes in their new curled position. Apply it carefully over the same area as the lifting solution, following the recommended time to ensure your lashes maintain their curl. This step solidifies the lift, marking the culmination of the reshaping process.
Step 6: Nourishing Aftercare
The Finishing Touch: Conclude your lash lift with a lash conditioning treatment. This step is vital for restoring moisture and nutrients to your lashes after chemical treatment. A good conditioner will help keep your lashes soft, healthy, and lustrous, enhancing the overall effect of the lift.
Navigating Risks with Care and Knowledge
- Chemical Precautions: Always use gloves and follow the kit's instructions to avoid accidental contact with the eyes. If any solution gets into your eyes, rinse immediately and seek medical advice.
- Application Accuracy: Uneven application can lead to uneven curls or underprocessed areas. Ensure each step is performed with care for uniform results.
- Patch Testing: To minimize the risk of allergic reactions, perform a patch test with the solutions 24-48 hours before the full application.
- Timely Monitoring: Keep a close eye on processing times to prevent overprocessing, which can weaken or damage your lashes.
How can I naturally lift my eyelashes permanently?
Permanently lifting your eyelashes naturally isn't possible, as all hair, including eyelashes, goes through a natural growth cycle, and any curl or lift will eventually fall out as the lashes renew. However, regular use of certain natural oils, like castor oil, can promote lash health and strength, potentially enhancing their natural curl over time.
What can I do instead of a lash lift?
For those seeking alternatives to a lash lift, using a good quality eyelash curler paired with a volumizing or curling mascara can offer a temporary lift and curl to your lashes. Another option is to try clear mascara or a lash-enhancing serum that supports the natural growth and curvature of your eyelashes without the commitment of a lash lift.
What can I use to give myself a lash lift?
If you decide to attempt a lash lift at home, you'll need a reputable lash lift kit that includes all necessary components: a silicone pad or shield, a lifting solution, a setting solution, and a nourishing oil or serum for aftercare. It's crucial to choose a kit with positive reviews and to thoroughly understand and follow the provided instructions to ensure the best and safest results.
Are lash lifts good or bad for your lashes?
Lash lifts, along with tints, are typically safe and do not harm your natural lashes. They effectively enhance the curl and deepen the color, providing a low-maintenance and durable beauty solution. Conversely, extensions could present a greater risk to your lash health if they're not applied correctly.
Final Thoughts
An at-home lash lift can be a rewarding experience when approached with the right knowledge and precautions. While the allure of DIY beauty enhancements is strong, recognizing the value of professional expertise is crucial, especially when it comes to treatments involving such a sensitive area. If you're committed to trying a lash lift at home, ensure you're well informed and prepared, turning this beauty activity into a safe and satisfying endeavour.